Charting with Cyunity
User Interface

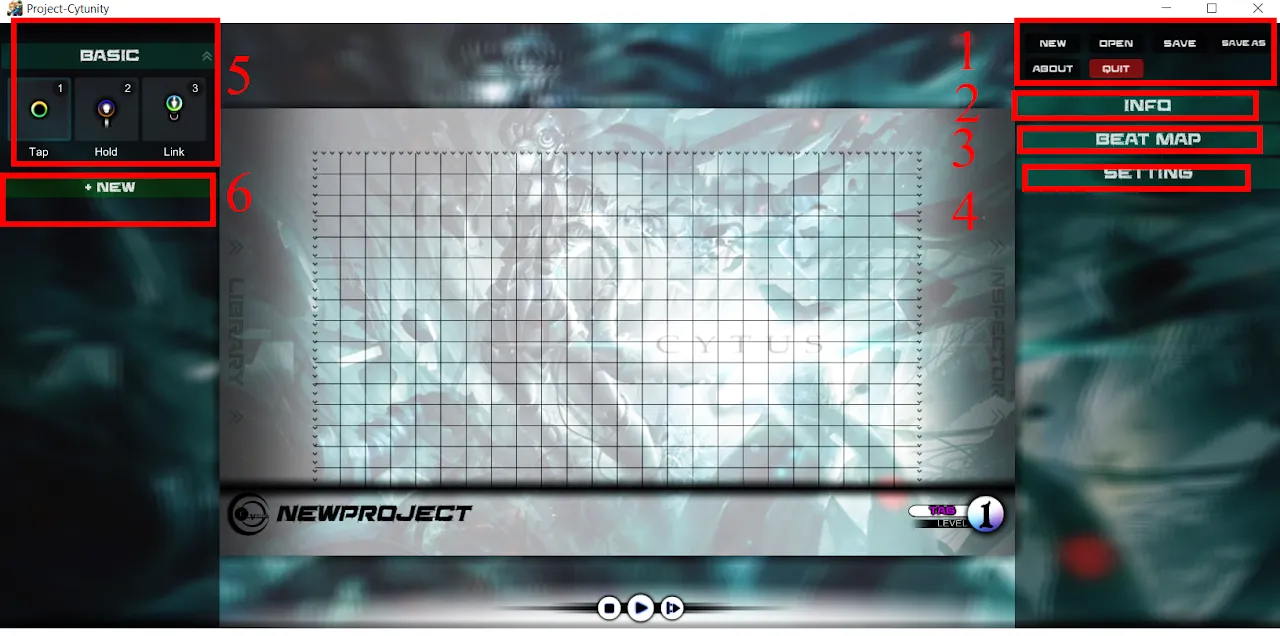
Project Operations
New: Start a new project.
Open: Opens an existing project.
Save: Saves your project.
Save As: Saves your project under a declared filename (author’s note: Last time i did this it didn’t save properly? Make sure your file is saved properly after Save As and before closing Cytunity)
About: Details on the creator of this program; links to the Baidu subforum for Cytunity.
Quit: Quits Cytunity after confirmation.
Info

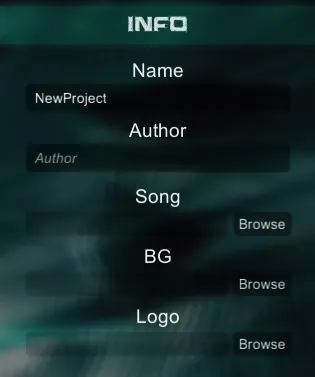
Name: The name of the song.
Author: (Optional)
Song: The song file. (supported format: .wav and .ogg)
BG: Background picture (.webp only)
Logo: (NOT NEEDED FOR CYTOID)
Cytunity will auto-generate save name based on Info Name, so you may want to fill it properly.
Before you can even chart, you need a song file first. It's mandatory.
NOTICE
None of this info actually matters (aside from song and name for charting) because Cytoid uses its own meta file (level.json).
Beat Map

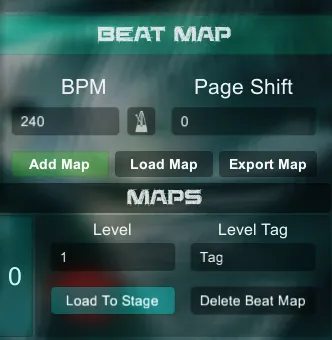
BPM: The BPM, or primary BPM of the song you will chart. The icon next to the value is a tool that helps you find the BPM.
Page Shift: This offsets your chart’s starting point for the scan line. Use this to have the beginning of each musical bar begin at the top or bottom of the chart.
Add Map: Adds an additional chart in the MAPS Section.
Load Map: If you have a Cytus text file and want to load it into Cytunity, use this button, and it will create that chart in Cytunity as an additional Map.
Export Map: Export your current chart as a Cytus
MAPS: This is a place where you manage all your charts for the song you are charting.
Level: The difficulty number of your chart
Level Tag: Easy, Hard, or Extreme.
Load To Stage: If you have multiple difficulties, use this button to switch between charts.
Delete Beat Map: Deletes your chart.
Settings

We have a ton of stuff to cover so I won’t be explicit on each section unless it is needed
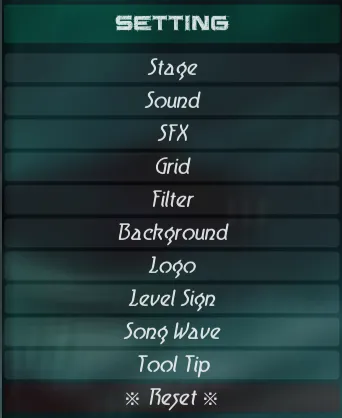
Stage: Switch between Autoplay and Edit modes to see your chart better, Options with notes (will not affect Cytoid)
Sound: Audio settings for within Cytunity (will not affect Cytoid)
SFX: Enables click sound effects (turn off if you need to closely listen to the song) (will not affect Cytoid)
Grid: Enables grid to snap notes (SERIOUSLY KEEP THIS ON AT ALL TIMES). Adjust Grid Num Y for different time signatures. You can keep Grid Num X at 24 (since 24 is the max).
Filter: Color filter for the BG image (will not affect Cytoid)
Background: Adjusts blur of the BG image (will not affect Cytoid)
Logo: Adjust Logo and Song Name size at the bottom left corner (No need to adjust)
Level Sign: Adjust Level icon size at bottom right corner (No need to adjust)
Song Wave: Shows a sound wave at the left side of the chart. Very useful for knowing where notes take place.
Tool-tip: Allows you to hover over buttons and text field and it will show text on what it does (your choice)
Reset: Set all settings to default.
Basic Notes (These are the basic notes in Cytus. There are some specific steps on the holds and Drag notes)
Adjust hold note length: Drag the end of the hold note bar up or down.
Add drag note to a drag note chain:
- First, place another drag note or copy paste 1 drag note.
- Move the first note of a chain (if there is only one note in the chain, just drag that note) to the end of the chain you want to extend.
- If a chain link icon appears when dragging the drag note over to the end of a drag note chain, release it and the notes will be linked.
Folders
You can use this to save certain note patterns you like, or easy note templates.
 Cytoid Wiki