 Cytoid Wiki
Full Specification
Version: 2.0.2
This specification details the storyboard schema; you can use this as a reference, but it is strongly encouraged to read the entire document before you start storyboarding to get a glimpse of the power (and limitations) of storyboarding.
Download the latest CytoidPlayer here!
⭐ Coordinate systems
Before we get into storyboarding, let's understand the game's different canvas and their coordinate systems:
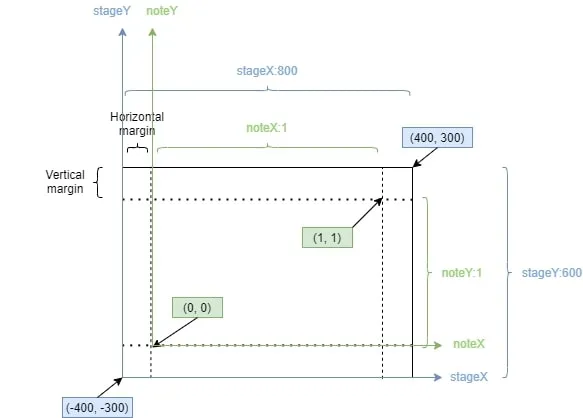
The canvas for storyboard sprites and texts, or stage, has a resolution of 800 (width) * 600 (height). (0, 0) is at the center. (400, 300) is the upper right corner. (-400, -300) is the lower left corner.
- The X and Y axes are called stageX and stageY.
The canvas for notes use the same unit as in charts, spanning [0, 1] in the X-axis and [0, 1] in the Y-axis, where (0, 0) is the lower left corner.
- The X and Y axes are called noteX and noteY.
The game camera has its own frame of reference based on its orthographic size. By default, camera is positioned at (0, 0).
The X and Y axes are called cameraX and cameraY.

Finally, there is also an Z axis for parameters that are, well, on the game's Z axis, or, the depth axis. You do not care about this axis unless you have set perspective to true in a scene controller.
- Note that the camera is looking at the +Z direction, and is by default at Z = -10. Setting a value like Z = -8 will put camera closer to the notes, while a value like Z = -15 will distance it away from the notes.
For any storyboard object property that uses a coordinate system above, you can transform their coordinate systems by using the following format:
[coordinate system]:[value].For example, say you have a sprite which you would like to display at the left of the bottom boundary of the gameplay/note area, which is exactly (0, 0) when expressed in noteX and noteY coordinate systems. However, the
xandyvalues of a sprite by default use the stageX and stageY coordinate systems.Before coordinate system transformations are introduced in 2.0.0, this is typically done by calculating the screen aspect ratio to estimate the corresponding coordinate in the stage canvas. This requires the storyboarder to create different storyboards for different screen aspect ratios (as seen here), and does not take into consideration that players can change their horizontal/vertical margins of the gameplay/note area.
Starting from 2.0.0, we can simply use coordinate system transformations to express the actual coordinate, like below:
json{ ... Sprite definition ... "x": "noteX:0", "y": "noteY:0" }When the storyboard is loaded into the game, Cytoid automatically calculates the actual
xandyvalues—without getting into the boring technical details, all you need to know is that the sprite will show up at the desired position of (0, 0) on the note canvas!
A more practical problem: how can we stretch a sprite to be a square such that its top and bottom are aligned to the screen boundaries?
A naive attempt would be:
json{ ... Sprite definition ... "preserve_aspect": false, // Allow stretching of the sprite "width": 600, "height": 600 }Unfortunately, this would not work: this is not necessarily a square. In fact, only devices with a 4:3 screen aspect ratio will render this as a square. Recall that the stage canvas resolution is 800 * 600 on any device, so 1 unit in stageX does not necessarily equal 1 unit in stageY.
- More simply put, when we set a sprite's
widthandheightto be both 600, what we actually mean is that this sprite takes up 600/800=3/4 of the screen width and 600/600=all of the screen height. Therefore, to make it a square, 3/4 of the screen width must be equal to all of the screen height, which enforces a 4:3 screen ratio.
- More simply put, when we set a sprite's
To align the square with top and bottom boundaries of the screen, the
heightnecessarily equals600; the problem stems from our definedwidth. So what went wrong? We assumed 1 unit ofwidth(stageX) is equal to 1 unit ofheight(stageY), which we now know is not the case. Then, if we can somehow makewidthuse the same unit asheight...json{ ... Sprite definition ... "preserve_aspect": false, "width": "stageY:600", "height": 600 }And that is it! We delegated the calculation to Cytoid—
stageY:600means 600 units in the stageY coordinate system. Whatever that value is, this has made sure our sprite will stretch to a square.
Finally, you should probably not transform any value to/from the depth coordinate system, as it does not make mathematical sense. But you can do it nonetheless! Feel free to try. 😇
Root object
- texts: array of text objects.
- sprites: array of sprite objects.
- ⭐ lines: array of line objects.
- ⭐ videos: array of video objects. Experimental!
- controllers: array of scene controller objects.
- You usually need only one controller to control the entire scene, but multiple controllers will come in handy if you need to define effects whose animation states overlap. For beginners, use only one controller.
- ⭐ note_controllers: array of note controller objects.
- templates: array of templates.
Base state (Parameters inherited by all objects)
⭐ There are two kinds of objects: scene objects (texts, sprites, lines, and videos) that appear in the scene, and controller objects (scene controllers and note controllers) that manipulate the scene components without an entity form.
States control how objects behave at different points of time. Not every moment of the object needs to be a state; only the "key" moments need to be defined.
For instance, consider a title text that flies from the bottom to the center of the screen from time=0 to time=3. Theoretically, it has infinitely many states, because at every moment its position is different. However, there are only two "key" states: 1. text at the bottom at time=0; 2. text at the center at time=3. Simply define these two states, and the storyboard will automatically calculate all the states in between.
Every defined object has at least one state, which is the initial state. You can define extra states of this object in the
statesarray.id: an unique string identifier of this object. If not set, a random alphanumeric ID will be generated. Supports the
$noteplaceholder (see the note controller section).⭐ target_id: for scene objects only. When
target_idis set to an ID of an object, this object does not have its own entity form but will control the specified instance instead. Supports the$noteplaceholder (see the note controller section).This is useful if you want to create animations that require overlapping states. For example, if you want to move a sprite in an arc, it is impossible to do this with only one scene object. You need two—one moves the sprite in the X direction with one easing (say,
linear), and another one moves the sprite in the Y direction with another easing (say,easeOutQuad). Like below:json{ "id": "sprite", "path": "dot.png", "time": 0, "x": 0, "easing": "linear", "states": [ { "time": 5, "x": 200 } ] }, { "target_id": "sprite", "time": 0, "y": 0, "easing": "easeOutQuad", "states": [ { "time": 5, "y": 200, } ] }Another example would be to simplify complex states. Say you want to move a text from x=0 at t=0 to x=100 at t=5, while also setting its opacity from a=1 at t=2.5 to a=0 at t=7.5. Without using a separate targeting scene object, you have to manually do some mental calculations to write down the 4 key states.
Keep in mind that the targeted object must be of same type of the current object. For example, you cannot set a sprite's target to be a text.
⭐ parent_id: for texts and sprites only. ****When
parent_idis set to an ID of an object, this object's movement follows the specified parent, i.e. this object's coordinate system is now relative to the parent's coordinate system. Supports the$noteplaceholder (see the note controller section).- For example, you can set sprite A's parent to be sprite B, so that when sprite A moves with sprite B. Any translation of sprite A is now using sprite B's position as the origin.
- Another fun thing to try is to set a sprite's parent to a note controller. Since a note controller has an implied position of the actual note, the sprite should follow the note's movement.
- No, you can't really make custom skins with this yet. See the note controller section for a in-depth explanation.
time: the base time of this object state, measured in seconds. Note that this may not be equivalent to the true timing—see how an object's exact timing is calculated below.
If
timeis not set and this is a scene object (i.e. text or sprite), this scene object is not spawned unless manually spawned by a trigger.If the value is in one of the following formats, an automatic replacement will be performed. Note that the quotes are necessary.
<Note ID>supports the$noteplaceholder (see the note controller section)."start:<Note ID>": start time of the specified note"end:<Note ID>": end time of the specified note"intro:<Note ID>": intro time (i.e. when the note fades in) of the specified note"start:<Note ID>:<Offset>": start time of the specified note +<Offset>(in seconds, can be negative)"end:<Note ID>:<Offset>": end time of the specified note +<Offset>in seconds, can be negative)"intro:<Note ID>:<Offset>": intro time (i.e. when the note fades in) of the specified note +<Offset>(in seconds, can be negative)- ⭐
"at:<Note ID>:<Percentage>": for hold notes only. start time of the specified note + (end time of the specified note - start time of the specified note) *<Percentage>- When
<Percentage>is0, this is equivalent tostart - When
<Percentage>is1, this is equivalent toend
- When
This value can also be an array, if you want to create multiple identical states at once. For example:
json"states": [ { "template": "pulse", "time": ["start:57", "start:123", "start:153"] } ]is automatically expanded to
json"states": [ { "template": "pulse", "time": "start:57" }, { "template": "pulse", "time": "start:123" }, { "template": "pulse", "time": "start:153" } ]
relative_time: the relative time to the parent state. For example,
json{ "time": 5, "states": [ { // State A "relative_time": 2.5 } ] }The timing of state A would be
5+2.5=7.5.add_time: the relative time to the last defined state. For example,
json{ "time": 5, "states": [ { "relative_time": 2.5 }, { // State B "add_time": 3 } ] }The timing of state B would be (
5+2.5) +3=10.5.How an object's exact timing is calculated, from highest priority to lowest priority:
- if
add_timeis defined: timing of the last defined state +add_time - if
relative_timeis defined, andtimeis also defined:time+relative_time - if
relative_timeis defined, and there exists a parent state: timing of the parent state +relative_time - if
relative_timeis defined, but there does not exist a parent state: current game time +relative_time(Note: this is intended for triggers) - if both
add_timeandrelative_timeare undefined:time
- if
easing: the easing used when animating this object from the current state to the next state. See https://easings.net/. Default
linear.destroy: if set to
true, this object is destroyed when it fully transitions into this state. For the sake of performance, it is strongly recommended to destroy an object when you do not need to use it anymore.In the following example along with the uses of triggers, the
Hello world!text is spawned and displayed when note 4 is cleared, transitions into zero opacity before destroyed.json... "texts": [ { "id": "hello_world", "text": "Hello world!", "size": 80, "opacity": 1, "states": [ { "opacity": 0, "relative_time": 0.5, "destroy": true } ] } ], "triggers": [ { "type": "noteClear", "notes": [4], "spawn": ["hello_world"] } ], ...
states: array of the extra states of this object.
You can define states in an inner state, which will be appended to the parent object. For example:
json{ ... Object definition ... "states": [ // States defined in the parent object { "template": "stateA", }, { "states": [ // States defined in an inner state { "template": "stateB" }, { "template": "stateC" } ] }, { "template": "stateD" } ] }is equivalent to
json{ ... Object definition ... "states": [ { "template": "stateA", }, { "template": "stateB" }, { "template": "stateC" }, { "template": "stateD" } ] }This is useful when you want to reuse multiple states at once. See the
pulsetemplate in the storyboard example.
Scene object state (Parameters inherited by text, sprite, video and line states)
- x: x-coordinate of the object. Default
0. Default coordinate system stageX. - y: y-coordinate of the object. Default
0. Default coordinate system stageY. - ⭐ z: z-coordinate of the object. Default
0. Default coordinate system depth.- Use only when perspective camera is enabled.
- rot_x: rotation of the object on the x-axis in degrees. Default
0. - rot_y: rotation of the object on the y-axis in degrees. Default
0. - rot_z: rotation of the object on the z-axis in degrees. Default
0. - scale_x: scale of the object on the x-axis. Default
1. - scale_y: scale of the object on the y-axis. Default
1. - scale: scale of the object on both axes. If used,
scale_xandscale_yare overridden. - pivot_x: pivot of the object when rotating/scaling on the x-axis.
0is at left and1is at right. Default0.5(center). - pivot_y: pivot of the object when rotating/scaling on the y-axis.
0is at bottom and1is at top. Default0.5(center). - opacity: transparency of the object.
0is fully invisible while1is fully visible. Default0.- That means all scene objects are invisible until you animate
opacityto any value greater than0.
- That means all scene objects are invisible until you animate
- width: width of the object. Default coordinate system stageX.
- height: height of the object. Default coordinate system stageY.
- ⭐ Starting from 2.0.0, text objects automatically fit to their content (
text). That means settingwidthandheighton a text will not do anything. - For sprites, the default dimensions are 200 (width) * 200 (height).
- ⭐ Starting from 2.0.0, text objects automatically fit to their content (
- layer: layer of the object. Default
0.0: The default layer. Behind all game elements except the background.1: Above all note elements, but under UI elements.2: Above all game elements.
- order: order of the object within its
layer. For example, an object with order3will display in front of an object with order2, assuming they have the samelayer. If both objects have the same order, the later defined object will display in front of the earlier defined object.- ⭐ Remember to always set the proper
orderon sprites! Otherwise, they may not show up in the actual game even they show up in CytoidPlayer. If you are unsure, you can just set it to0.
- ⭐ Remember to always set the proper
- fill_width: if
true,widthandheightare ignored, and this scene object automatically scratches to the stage's width and has a height of10000.- Useful if you just want to make a sprite that fills the entire viewport, like a background image.
Text state
- text: the text to be displayed. Note that (very limited) rich text is supported (bold, italic, inline size, inline color).
- color: color of the text in the hex representation (i.e. "#fff" or "#4568dc"). Default
"#fff"(white). - size: font size of the text. Default
20.- To animate the size of a text, animate its
scaleproperty. Do not animatesize, which only takes integer values and is resource-intensive.
- To animate the size of a text, animate its
- align: text alignment.
upperLeft,upperCenter,upperRight,middleLeft,middleCenter,middleRight,lowerLeft,lowerCenter,lowerRightare supported. DefaultmiddleCenter. - ⭐ letter_spacing: letter spacing. Default
0. - ⭐ font_weight: font weight.
regular,extraLight,bold,extraBoldare supported. Defaultregular.
Sprite state
- path: relative path to the image file. For example, if the path is
"sprite.png", the file should be at the same location as thestoryboard.jsonand namedsprite.png. Only.jpgand.pngare supported. For best performance, keep resolution below 1920px * 1080px, and convert PNGs to JPGs when transparency is not needed. - preserve_aspect: if
true, the image aspect ratio is preserved. Defaulttrue. - color: color tint of the sprite in the hex representation. Default
"#fff"(white), which is equivalent to untinted.
⭐ Video state experimental
- path: relative path to the video file. Since supported video codecs are different across platforms and devices, it is strongly recommended to use a standard H.264
.mp4file at maximum 720p resolution.- Video will not pause when the game is paused. This is a known issue.
- color: color tint of the video in the hex representation. Default
"#fff"(white), which is equivalent to untinted.
⭐ Note controller state
A note controller overrides and animates the properties a single note defined in the chart file. This is the most powerful storyboard technique so far. You can implement almost any desired gameplay in Cytoid using note controllers!
note: integer ID of the note, as defined in the chart file.
override_x: if
true, the x-coordinate of the note is overriden. Seex,x_multiplieranddx. Defaultfalse.x: overridden x-coordinate of the note. Default coordinate system noteX.
- Reminder that you can unset this value by setting it to
null.
- Reminder that you can unset this value by setting it to
x_multiplier: multiplies onto the x-coordinate of the note. Default
1. Has no effect ifxis already set.dx: adds onto the x-coordinate of the note. Default
0. Default coordinate system noteX. Has no effect ifxis already set.override_y: if
true, the y-coordinate of the note is overriden. Seey,y_multiplieranddy. Defaultfalse.y: overridden y-coordinate of the note. Default coordinate system noteY.
- Reminder that you can unset this value by setting it to
null.
- Reminder that you can unset this value by setting it to
y_multiplier: multiplies onto the y-coordinate of the note. Default
1. Has no effect ifyis already set.dy: adds onto the y-coordinate of the note. Default
0. Default coordinate system noteY. Has no effect ifyis already set.BUG WARNING!
As of 2.0.2, this property is incorrectly implemented, and you have to add
1to the value you want to set for notes that are in a chart page of-1direction.dxanddywill be replaced withx_offsetandy_offsetin the future. In the meantime, you can still usedy—just be very careful of it. If the note positions do not match with your expectations, add1to it.
How the x-coordinate of a note is calculated, from highest priority to lowest priority:
- If
override_xistrueandxis defined:x - If
override_xisfalseandxis not defined (null): original x-coordinate *x_multiplier+dx - Otherwise: original x-coordinate
- Same applies to the y-coordinate.
- If
override_z: if
true, the z-coordinate of the note is overriden. Seez. Defaultfalse.z: overridden z-coordinate of the note. Default coordinate system depth.
override_rot_x: if
true, the rotation of the note on the x-axis is overriden. Seerot_x. Defaultfalse.rot_x: overridden rotation of the note on the x-axis in degrees. Default
0.override_rot_y: if
true, the rotation of the note on the y-axis is overriden. Seerot_y. Defaultfalse.rot_y: overridden rotation of the note on the y-axis in degrees. Default
0.override_rot_z: if
true, the rotation of the note on the z-axis is overriden. Seerot_z. Defaultfalse.rot_z: overridden rotation of the note on the z-axis in degrees. Default
0.override_ring_color: if
true, the ring color of the note is overriden. Seering_color. Defaultfalse.ring_color: overridden ring color of the note. When set to
null, user ring color is used. Defaultnull.override_fill_color: if
true, the fill color of the note is overriden. Seefill_color. Defaultfalse.fill_color: overridden fill color of the note. When set to
null, user fill color is used. Defaultnull.opacity_multiplier: multiplies onto the opacity of the note. Default
1.size_multiplier: multiplies onto the size of the note. Default
1.
BUG WARNING!
As of 2.0.2, this property only works on clicks and flicks.
hold_direction: direction of the "tail" of a hold note; only applicable if
noteis a hold note.1is upwards and-1is downwards. When set tonull, original hold direction is used. Defaultnull.style: controls specific styling of the note; only applicable to hold notes for now.
1and2are supported. Default1.1: The default style.2: The triangle that connects the scanline and the hold note will be hidden; the tail becomes shorter as the hold note progresses; the clear effect will be played at the hold note, not the scanline's position.
Now you know how to control a note with a note controller, you will soon find this job tedious: what if I want to control, say, all flick notes, or all notes from ID 300 to 500? Note selectors come to the rescue!
A note selector is an JSON object (i.e. wrapped in
{}braces) with following properties:- type: array of acceptable note types. For example,
[3,4,6,7]selects all drags and c-drags. - start: minimum ID of the note.
- end: maximum ID of the note.
- direction: direction of the note's page.
1indicates that this note is scanned upwards, and-1indicates that this note is scanned downwards. - min_x: minimum x-coordinate of the note.
- max_x: maximum x-coordinate of the note.
- type: array of acceptable note types. For example,
Note selectors are best understood by thinking them as "filters" on notes. Following are some examples:
Select all click notes with ID ranged from 250-275:
json{ "type": [0], "start": 250, "end": 275 }Select all notes on the left side of the screen:
json{ "min_x": 0, "max_x": 0.5 }Select all notes which will be scanned by the scanline downwards:
json{ "direction": -1 }Select all notes (equivalently, apply no filters):
json{}
To use a note selector, simply set it as the
noteof a predefined note controller:json{ "note": { "start": 7, "end": 9 }, "override_x": true, "x": 0.25 }When loaded into the game, Cytoid filters the notes with the conditions defined in the selector. In this case, we know exactly 3 notes will be selected. This note controller is then automatically expanded into 3 note controllers:
json{ "note": 7, "override_x": true, "x": 0.25 }, { "note": 8, "override_x": true, "x": 0.25 }, { "note": 9, "override_x": true, "x": 0.25 }Which, as you expect, aligns the 3 notes at x = 0.25.
(Advanced) An interesting detail: you can actually use note selectors in other scene objects, such as sprites and texts. For example:
json{ ... "sprites": [ { "note": {}, "path": "image.jpg" } ] ... }This spawns an image for every note. Pretty useless, right?—You will see in a second how this will be useful in conjunction with the
$noteplaceholder.The last piece of our note controller toolbox is the
**$noteplaceholder**. It can be used inid,parent_id,target_idandtime; each occurrence will be replaced by the note ID in the current context. Do not worry if this sounds confusing to you at first, because it is.We start with an example to illustrate why we need the
$noteplaceholder. Imagine we want to fade out a note as soon as it appears (similar to the "hidden" mod in osu!). Let's say this note has an ID of 100. We can come up with the note controller pretty quickly:json{ "note": 100, "opacity": 1, "time": "intro:100", "states": [ { "opacity": 0, "time": "intro:100:0.2" } ] }As soon as the note appears, this note controller starts to take effect and eventually fades out the note completely after 0.2 seconds. It works, so what is the problem?
The problem is this solution does not scale. What if we want to fade out all the notes after they appear? It is tempting to use a note selector that we just learned, but...
json{ "note": {}, "opacity": 1, "time": "intro:???", // What note ID should we use? "states": [ { "opacity": 0, "time": "intro:???:0.2" // What note ID should we use? } ] }Recall that from our previous knowledge, a note selector is just a useful "syntax sugar" that creates a note controller for every selected note with the same set of properties. In this case, every note controller do not actually share the same set of properties; the values of
timemust point to the intro time of different notes in each expanded note controller. This is what we would like to see:json{ "note": 1, "opacity": 1, "time": "intro:1", "states": [ { "opacity": 0, "time": "intro:1:0.2" } ] }, { "note": 2, "opacity": 1, "time": "intro:2", // Different from the first note controller! "states": [ { "opacity": 0, "time": "intro:2:0.2" // Different from the first note controller! } ] }, ...This is where the
$noteplaceholder can help us. Recall that every occurrence of$notein propertyid,parent_id,target_idortimeis replaced by the note ID in the current context, or, more simply put, by the note ID of the controller where the property is located. In other words, we can write:json{ "note": {}, "opacity": 1, "time": "intro:$note", "states": [ { "opacity": 0, "time": "intro:$note:0.2" } ] }Which is first automatically expanded into:
json{ "note": 1, "opacity": 1, "time": "intro:$note", "states": [ { "opacity": 0, "time": "intro:$note:0.2" } ] }, { "note": 2, "opacity": 1, "time": "intro:$note", "states": [ { "opacity": 0, "time": "intro:$note:0.2" } ] }, ...Then every
$noteis automatically replaced by the actual note ID in their context:json{ // Within this note controller, $note is always 1 "note": 1, "opacity": 1, "time": "intro:1", // $note replaced by 1 "states": [ { "opacity": 0, "time": "intro:1:0.2" // $note replaced by 1 } ] }, { // Within this note controller, $note is always 2 "note": 2, "opacity": 1, "time": "intro:2", // $note replaced by 2 "states": [ { "opacity": 0, "time": "intro:2:0.2" // $note replaced by 2 } ] }, ...Which is exactly what we want. Isn't that beautiful?
(Advanced) Protip: we showed how to use
$noteintime, but how about inid,parent_idandtarget_id? It turns out, like note selectors, the$noteplaceholder can be used in any other scene object. We just showed above how to spawn a sprite for every note, so let's see how to make them appear together with the note—or, custom note skins!json{ ... "note_controllers": [ { "note": {}, "id": "note_controller_$note", "time": 0, "opacity_multiplier": 0 } // Creates a note controller for each note, each with a distinct id, and makes the note invisible ], "sprites": [ { "path": "image.jpg" "note": {}, // Spawn an image for each note... "parent_id": "note_controller_$note", // ...that locates and moves relative to the note (i.e. follows the note) "opacity": 0, "time": "intro:$note", // ...that is hidden until the note appears "states": [ { "opacity": 1, "time": "start:$note" // ...that becomes fully visible when the note is meant to be hit }, { "add_time": 0.5, "destroy": true // Destroy after 0.5 seconds } ] } ] ... }Unfortunately, this looks more promising than it actually is. If you hit the notes early, the note controller no longer has a valid position, so the skin sprite resets its position and "teleports" to the center of the screen. When storyboard events are implemented in the future, we will be able to destroy the sprite as soon as the note is cleared, mimicking note skinning more convincingly.
- An important takeaway here, though, is that although note controllers do not appear in the game, they actually have an implicit position, which is aligned with the position of their target note! Therefore, if you ever want to align some scene object with a note, just define a note controller for that note and set the parent of the scene object to the note controller.
A few common tricks:
To create vertical-scrolling style gameplay, simply set
override_ytotrue, and animateyfrom2(or any value that is surely out of the vertical screen boundary) at time =intro:$noteto0at time =start:$note.In the Interference: Finale EX storyboard, vertical-scrolling style gameplay is mixed with scanline gameplay. This is achieved by the charter first predefining a set of notes in the storyboard at a fixed X value, say, 0.4. Then the storyboarder uses a note selector that selects notes at X = 0.4 and animates them so that only they would fall onto the bottom of the screen, while other notes remain "normal."
Note: Due to accuracy issues of decimals, do not select notes at X = 0.4 like this:
json{ "min_x": 0.4, "max_x": 0.4 }Instead, do:
json{ "min_x": 0.39999, "max_x": 0.40001 }
To move a note in a curve, use two note controllers, one animates
xand one animatesy, each with differenteasing(for example,easeInCircandeaseOutCircso that the note follows a trajectory of quarter of a circle).Fix
yto a constant value to mimic osu-style gameplay.
⭐ Line state
"Line" is actually a misnomer. A line object renders connected line segments. You can use it to mimic a scanline or draw any geometry shape, like a triangle.
Although the line state technically inherits from the scene object state, only a very limited subset of parameters in the scene object state are supported:
opacity,layerandorder.pos: array of vertex objects.
- Each vertex is a JSON object with following properties:
- x: x-coordinate of the vertex. Default coordinate system noteX.
- y: y-coordinate of the vertex. Default coordinate system noteY.
- z: z-coordinate of the vertex. Default coordinate system depth.
- Each vertex is a JSON object with following properties:
width: width of the line segments. Default
0.05.color: color of the line segments in the hex representation. Default
"#fff"(white).An example to animate a triangle using two line states:
json{ "time": 0, "opacity": 1, "pos": [ { "x": 0, "y": 0 }, { "x": 1, "y": 0 }, { "x": 0, "y": 1 }, { "x": 0, "y": 0 } ], "states": [ { "time": 20, "pos": [ { "x": 0, "y": 1 }, { "x": 1, "y": 0 }, { "x": 1, "y": 1 }, { "x": 0, "y": 1 } ] } ] }Try this yourself and figure out why the triangle animates like that! 😉
Scene controller state
storyboard_opacity:
opacityof all storyboard scene objects. Default1.ui_opacity: opacity of the game UI (score, info, pause button...). Default
1.scanline_opacity: opacity of the scanline. Default
1.background_dim: opacity of the background dim. Default
0.85.note_opacity_multiplier:
opacityof all notes will be multiplied by this value. Default1.scanline_color: override the scanline color. If not set (or set to
null),#ffffffwill be used when the chart is not changing speed,#d25669for speeding up,#a0c8bffor speeding down.note_ring_color: override the ring color of all note. If not set (or set to
null), user ring color is used.⭐ note_fill_colors: override the fill colors of different types of notes.
Format:
[click 1, click 2, drag 1, drag 2, hold 1, hold 2, long hold 1, long hold 2, flick 1, flick 2, c-drag 1, c-drag 2]The following example sets the color of all click notes to
#4568dcand the color of all flick notes to#000000:json... "note_fill_colors": ["#4568dc", "#4568dc", null, null, null, null, null, null, "#000000", "#000000", null, null], ...Note: if any color is not set (or set to
null), user color will be used.
override_scanline_pos: if
true, the y-coordinate of the scanline is overriden. Seescanline_pos. Defaultfalse.scanline_pos: overridden y-coordinate of the scanline. Default minimum
0and maximum1, but out-of-bound values are also accepted. Default coordinate system noteY.perspective: if
true, a perspective camera is used; iffalse, an orthographic camera is used. Defaulttrue.size: only takes effect if
perspectiveisfalse. Controls the viewport size of the orthographic camera. Larger the size, smaller the scene. Default5.fov: only takes effect if
perspectiveistrue. Controls the field of view of the perspective camera (basically equivalent tosize, but for the perspective camera). Larger the field of view, smaller the scene. Default53.2.- Hint: to create the pulsing effect, increase this value from
53.2to59.2(or any number larger than53.2), then decrease to53.2again. 53.2is a magic number that ensures even in perspective mode, the note size is approximately the same as in orthographic mode.
- Hint: to create the pulsing effect, increase this value from
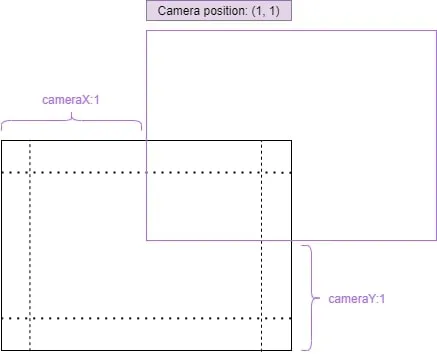
x: x-coordinate of the camera. A greater value shifts the whole scene to left, vice versa. A length of
1is equivalent to half the screen width. Default0. Default coordinate system cameraX.y: y-coordinate of the camera. A greater value shifts the whole scene to bottom, vice versa. A length of
1is equivalent to half the screen height. Default0. Default coordinate system cameraY.⭐ z: z-coordinate of the camera. A greater value moves the camera closer to the notes, vice versa. Default
-10. Default coordinate system depth.rot_x, rot_y, rot_z: rotations of the camera. Default
0.- Hint: if you rotate along the x or y axis, part of the scene may not be able to be seen; you have to adjust the coordinates of the camera accordingly. If change
rot_x, movey; if changerot_y, movex.
- Hint: if you rotate along the x or y axis, part of the scene may not be able to be seen; you have to adjust the coordinates of the camera accordingly. If change
⭐ vignette removed: boolean to toggle the vignette effect. Default
false.- vignette_intensity: the intensity of the vignette effect. Ranged
0to1. - vignette_color: the color of the vignette effect in the hex representation.
- vignette_start, vignette_end: just play around with these values because no one knows what they exactly mean. Ranged
0to1.
- vignette_intensity: the intensity of the vignette effect. Ranged
⭐ chromatic removed: boolean to toggle the chromatic aberration effect. Default
false.- chromatic_intensity: the intensity of the chromatic effect. Typically ranged
0to0.15, although larger values can be set for distorting effects. - chromatic_start, chromatic_end: just play around with these values because no one knows what they exactly mean. Ranged
0to1.
- chromatic_intensity: the intensity of the chromatic effect. Typically ranged
chromatical: boolean to toggle the chromatical ****effect. Default
false.- This effect is basically an automated chromatic aberration effect.
- chromatical_fade: the transparency of the chromatical effect. Ranged
0to1. - chromatical_intensity: the intensity of the chromatical effect. Ranged
0to1. - chromatical_speed: the speed of the chromatical effect. Ranged
0to3.
bloom: boolean to toggle the bloom effect. Default
false.- bloom_intensity: Ranged
0to5.
- bloom_intensity: Ranged
radial_blur: boolean to toggle the radial blur effect. Default
false.- radial_blur_intensity: Ranged
-0.5to0.5. Default0.025.
- radial_blur_intensity: Ranged
color_adjustment: boolean to toggle color adjustment. Default
false.- brightness: Ranged
0to10. Default1. - saturation: Ranged
0to10. Default1. - contrast: Ranged
0to10. Default1.
- brightness: Ranged
color_filter: boolean to toggle the screen color filter. Default
false.- color_filter_color: color of the screen filter in the hex representation.
gray_scale: boolean to toggle the gray scale effect. Default
false.- gray_scale_intensity: Ranged
0to1.
- gray_scale_intensity: Ranged
noise: boolean to toggle the noise effect. Default
false.- noise_intensity: Ranged
0to1. Default0.235.
- noise_intensity: Ranged
sepia: boolean to toggle the sepia effect. Default
false.- sepia_intensity: Ranged
0to1.
- sepia_intensity: Ranged
dream: boolean to toggle the dream effect. Default
false.- dream_intensity: Ranged
0to1.
- dream_intensity: Ranged
fisheye: boolean to toggle the fisheye effect. Default
false.- fisheye_intensity: Ranged
0to1. Default0.5.
- fisheye_intensity: Ranged
shockwave: boolean to toggle the shockwave ****effect. Default
false.- shockwave_speed: Ranged
0to10. Default1.
- shockwave_speed: Ranged
focus: boolean to toggle the focus (manga focus lines) ****effect. Default
false.- focus_size: Ranged
1to10. Default1. - focus_color: color of the focus lines in the hex representation.
- focus_speed: Ranged
0to30. Default5. - focus_intensity: Ranged
0to1. Default0.25.
- focus_size: Ranged
glitch: boolean to toggle the glitch effect. Default
false.- glitch_intensity: Ranged
0to1.
- glitch_intensity: Ranged
arcade: boolean to toggle the focus (manga focus lines) ****effect. Default
false.- arcade_intensity: Ranged
0to1. Default1. - arcade_interference_size: Ranged
0to10. Default1. - arcade_interference_speed: Ranged
0to10. Default0.5. - arcade_contrast: Ranged
0to10. Default1.
- arcade_intensity: Ranged
tape: boolean to toggle the tape (screen flipping) effect.
Trigger State experimental
Obsolete
Do not use—will be replaced with storyboard events in a future release.
- Note that triggers are currently poorly optimized. Spawning high-resolution sprites may result in lag spikes.
- type: type of the trigger.
noteClear: If any note innotesis cleared, this trigger is fired.combo: If the combo amount reachscombo, this trigger is fired.score: If the score amount reachesscore, this trigger is fired and destroyed, regardless ofuses.
- ses: maximum amount of times this trigger is allowed to fire. If set to
0, this trigger is allowed to fire indefinitely. Default0. - notes: (only when
typeequalsnoteClear) a list of note ids.- Example: if set to
[352, 353, 390]andtypeis set tonoteClear, this trigger will fire when any of the notes 352, 353, and 390 is cleared.
- Example: if set to
- combo: (only when
typeequalscombo) an integer. - score: (only when
typeequalsscore) an integer. - spawn: a list of object ids to spawn.
- destroy: a list of object ids to destroy. (Destroyed objects can be spawned again by another trigger.)